
![[.amretasgraphics.blog.]](https://blogger.googleusercontent.com/img/b/R29vZ2xl/AVvXsEgFQfFSMw8kH7FTszaSctfE_LMtF1YdnBm8ZGLCQh3nYmSYOT-75IDrVa8uB4IUly81wpxAfPgKGAsfPBd68nmusuKk1C5mX7Rv1pfmyEq5Lf5ozhZ7asUZrPne2s98DmCsjQxc3eGBTdic/s1600-r/header_henpartyserif.jpg)
Welcome to the first Graphic Goodness Gratitude Exercises - Week 1!
Today or tomorrow, set aside at least 30 minutes to get to know and get familiar with some basic tools on Adobe Photoshop that I use most often to create 'cutout' graphics, Amretasgraphics style. It is a very important step to kick start your "graphic goodness creative muscles", which means, the more you practice, the more you'll get creative... guaranteed!
And if you are already familiar with working on Photoshop, feel free to develop your own techniques later, and share it with us here, or on Facebook.
First, start with opening (in Adobe Photoshop) the digital papers I included in the f.r.e.e. goodiebag (if you haven't got one, get it here). Get familiar with them.
Second, create a "working board" - the main board where you are going to use to create the gratitude card. Here are the steps:
Third, choose from the digital papers one which will be the background. In the sample that you can download above (the link below the image), I use a light-beige paper.
Fourth, let's get familiar with the "Marquee" tools
 On the screenshot here, the toolbar is shown on the left. If you can't see it, click on "window" on the menu at the top, then make sure that the "tools" option is ticked.
Here, the Marquee tools are shown on the top-left corner of the tool bar. We will use mostly two of the marquee tools: the rectangular and the elliptical.
Now, try to use this tool. To follow the sample: open the yellow digital paper, then after clicking the elliptical marquee tool, place the cursor somewhere on the paper and drag your mouse until it creates a selection area with a size you want.
Copy the selected area (click on "edit" at the menu on top, then "copy") - then switch again to the working board and paste the selection.
Fifth, now move on and get familiar with the "Move" tools (located next to the Marquee tool, on the toolbar).
Notes:

Now, move the yellow round image to the bottom of the working board. Make sure that the Move tool is working on / moving the right layer / image. You can check it with the layer list. The layer that you're working on will be highlighted.Today or tomorrow, set aside at least 30 minutes to get to know and get familiar with some basic tools on Adobe Photoshop that I use most often to create 'cutout' graphics, Amretasgraphics style. It is a very important step to kick start your "graphic goodness creative muscles", which means, the more you practice, the more you'll get creative... guaranteed!
And if you are already familiar with working on Photoshop, feel free to develop your own techniques later, and share it with us here, or on Facebook.
First, start with opening (in Adobe Photoshop) the digital papers I included in the f.r.e.e. goodiebag (if you haven't got one, get it here). Get familiar with them.
Second, create a "working board" - the main board where you are going to use to create the gratitude card. Here are the steps:
- on the "File" menu on top, click "new"
- set the width and height of your preference. To give you example here, I made 640 x 480 pixels boards.
- voila, your "working board" is created
Third, choose from the digital papers one which will be the background. In the sample that you can download above (the link below the image), I use a light-beige paper.
Here are the steps:
- Open the file, click "select" on the menu on top, then click "all" on the sub-menu
- Click "edit" on the menu on top, then click "copy"
- Now open the working board on the other window (if you click "window" on the menu on top, you can see the filenames at the bottom of the sub-menu. And if you haven't named your file, normally it will show as 'untitled')
- Paste the file to the working board (click "edit" on the menu on top, then "paste")
- voila, the background image is created
Fourth, let's get familiar with the "Marquee" tools

Here, the Marquee tools are shown on the top-left corner of the tool bar. We will use mostly two of the marquee tools: the rectangular and the elliptical.
Now, try to use this tool. To follow the sample: open the yellow digital paper, then after clicking the elliptical marquee tool, place the cursor somewhere on the paper and drag your mouse until it creates a selection area with a size you want.
Copy the selected area (click on "edit" at the menu on top, then "copy") - then switch again to the working board and paste the selection.
Fifth, now move on and get familiar with the "Move" tools (located next to the Marquee tool, on the toolbar).
Notes:
- when you paste an image to the working board, it will by default pasted on to the middle. You need to use the Move tool to move the image around, and make a composition of a few images together.
- when you paste or add an image to the working board, a new layer will be created. You can check it with the layer window, shown here on the right of the screenshot. If you can't see it, click "window" on the menu at the top, then make sure that the option "layers" is ticked.

To create a composition of several yellow round images like shown in the sample, you need to paste 2 more. And there are two ways of doing this:
- Click "paste" again : the same selection area / image will be pasted again to the working board.
- Click "layer" on the menu at the top, then click "duplicate layer". The highlighted layer / image will be duplicated.
Using the Move tool, move around the layers / images and make a composition as you like. You will use this Move tool all the time, so be sure to like it :o)
Sixth, more tools to be familiar with: "lasso" tools
On the toolbar, the lasso tools are located below the marquee tools. They are similar to marquee, but you can create your own shapes with these tools.

Now in the sample I will use the "polygonal lasso tool" to create a triangle (for the tree). Here are the steps:
- Click the "polygonal lasso tool" then click it (the mouse) on the brown paper. Move the mouse / cursor until you get the length you want, to the direction you want, click, then move again to another direction, click, then move again to meet the start. Click. And then you must get a selected area as shown below.

Click "copy" then "paste" the image to the working board.
Notes:
- By now you know that when I write "copy", it means that you should click "edit" on the menu at the top, then click "copy"
- When I write "paste", it means that you should open / switch to the working board, then click "edit" on the menu at the top, and then click "paste"
Now you'll get this on your working board:

You can use the Move tool to move around the brown image to the place that you want. You can repeat the "paste" or use "duplicate layer" as shown above to create more of the same images, if you want (why don't you try later?)
Seventh, let's get more familiar with the: "lasso" tool. I will create the leaves for the tree...
On a green paper (of course, open one first :o)) I click the "lasso" tool (the one on top of the three lassos - the 'free hand' one) - and then 'draw' leaves using the lasso. It needs a lot of practice. Just practice practice and practice. You'll love the 'homemade' cutout result. My drawing looks like this (see the selected area?):

Copy and paste the image to the working board
Again, use the Move tool to move the image until it gets to the place / position you like

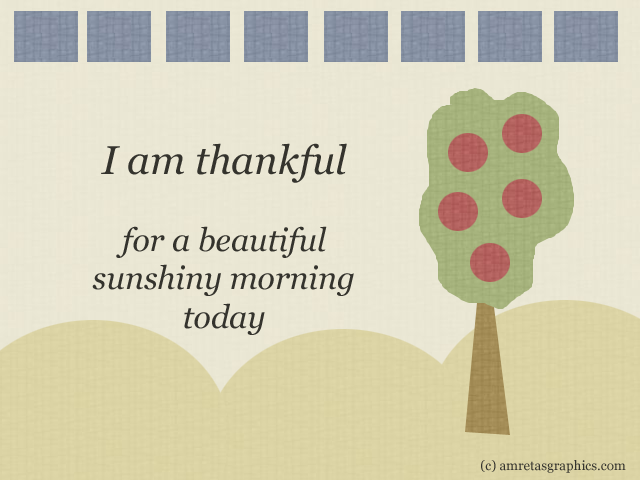
Yay! Do you notice the rectangular blue images? Yip, I just repeated the same steps, only this time using the rectangular "marquee" tool. Then I did the same thing as the yellow round images: repeated the paste or duplicate layer steps, and moved the images to make a composition like shown above.
Eigth, add your gratitude text using "type" tool. Adobe Photoshop is fabulous when it comes to adding text. I really love this program. (Adobe InDesign is another, when you create documents for printing). Let's see the screenshot below:

Once you click on the "type" tool on the toolbar (the T button), the type toolbar will appear at the top. Choose the font, size, alignment (left, center, right) and anti-aliasing method (I always use "crisp" - that's the best I found!) - click your mouse somewhere and start writing. Don't worry you can edit the text later. Just start somewhere.
To edit the text, make sure that you're on the "type" mode (the type tool is clicked) and that you're on the right text layer (see on the layer list - the text you want to change should be highlighted. If not, click on the list the layer you want to edit, it will be highlighted)
Now select / highlight the text you want to edit. Change the size, the font, the alignment.
To edit the color of the text, after highlighting the text you want to edit, click on the color box next to the text alignment options. Play with the colors... (pssst: playing with colors is one of my favorite subjects, so I will talk about this in one of my next posts in the series. stay tune)
Once you're done, click on the Move tool and you can move the text around :o)
Tips:
Don't forget to create a copyright text, a small one but visible, and place it on the corner (or wherever you like, it's Your creation :o))
Now the final step for this week's exercise: SAVE your work as IMAGE
When you're ready, and your working board looks good... hit "file" on the menu on top and choose "save as" or "save for web" on the sub-menu. Then, save it as gif, jpg, or png file. Just experiment and play a little bit until you find the format that you think it's best for you.
And voilà! Congratulations! You've completed your first exercise! :o)
Well..... how do you like it? I hope you have a nice start and that now you're inspired and energized with the words of gratitude on the cutout cards you are going to create.
Personal note from Amreta:
"A gratitude card a day brings happiness your way"
Do-It-Your-Way challenge this week
|
Have a graphic goodness today!

No comments:
Post a Comment